What Colour Is the Positive Battery Cable?
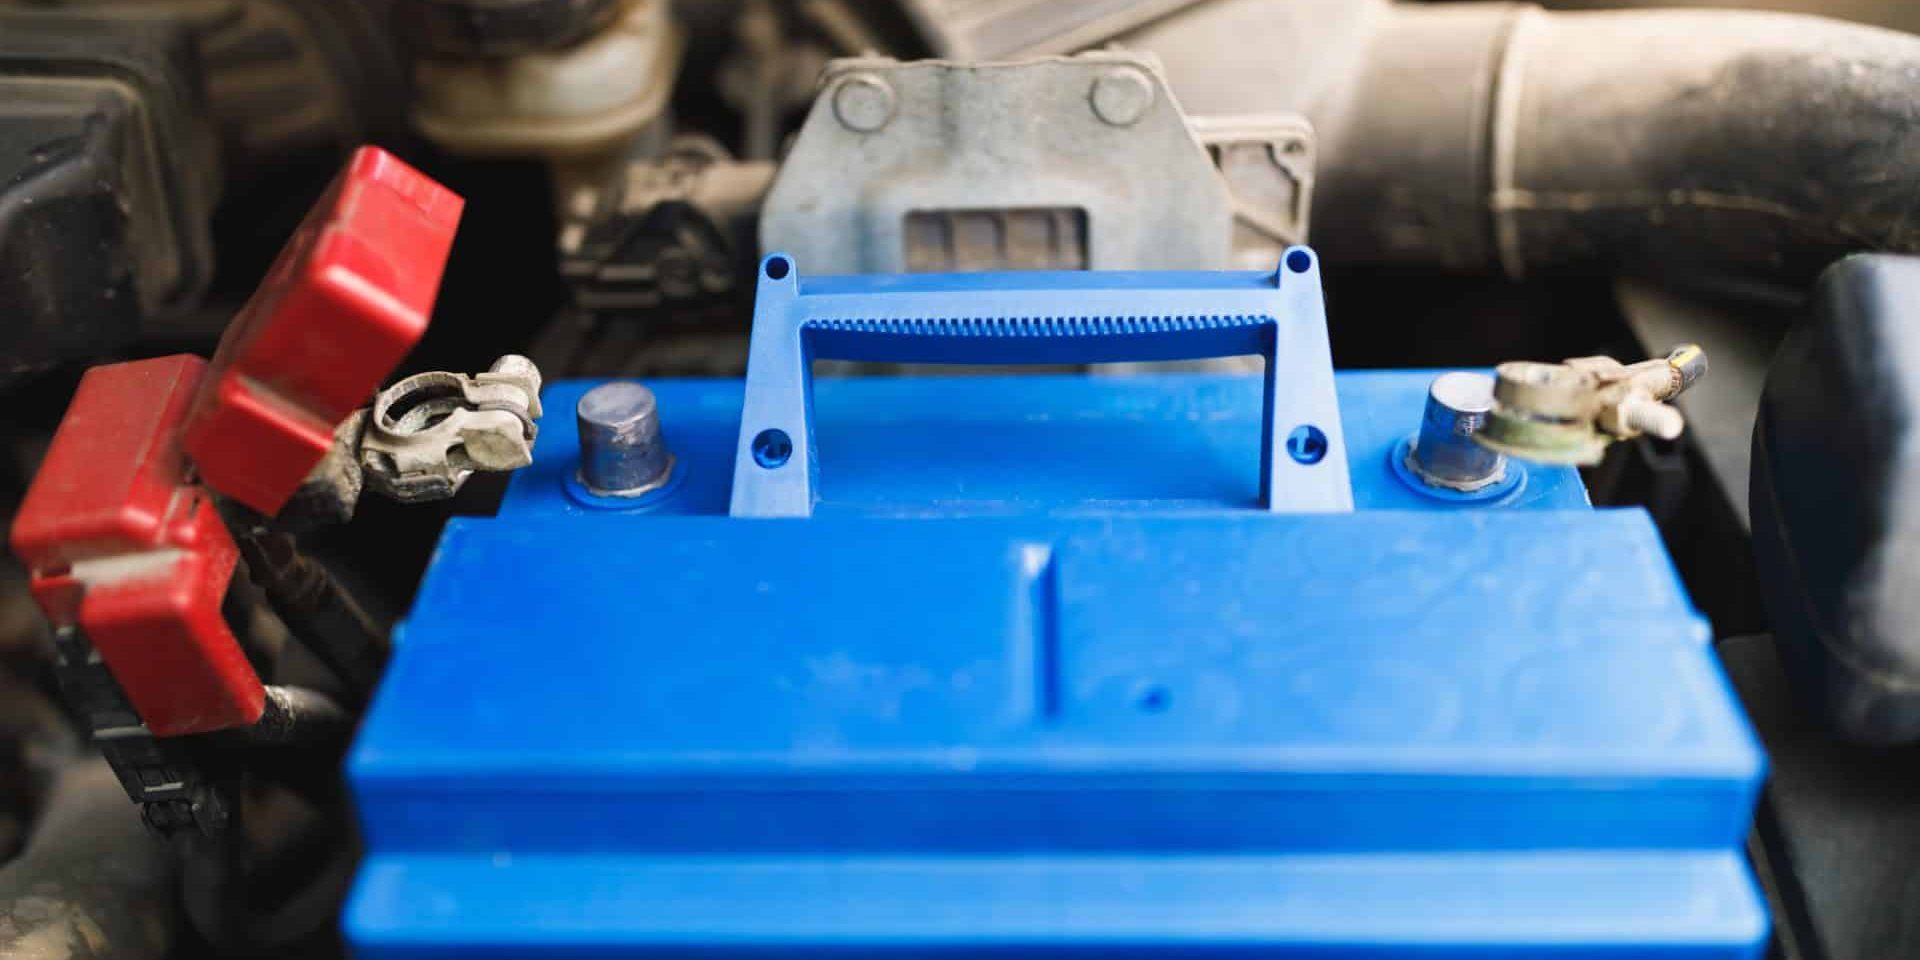
The positive battery cable is red. The negative battery cable is black. Red connects to the positive (+) terminal on the battery. Black connects to the negative (-) terminal. This colour coding is a universal standard across every car manufacturer and applies to all 12-volt automotive batteries worldwide, whether the vehicle is sold in the US, the UK, Europe, Asia, or anywhere else. The same red-positive, black-negative convention applies to jump leads, battery chargers, and any aftermarket wiring that connects to the battery.
How to Identify the Positive Terminal
Colour is the fastest visual clue, but it is not always reliable on its own. Heat, dirt, engine grime, corrosion, and years of use can leave both cables looking the same shade of dark grey or brown. A previous owner or workshop that replaced a cable might have used whatever colour was available. For these reasons, the battery itself carries multiple identification methods that do not depend on cable colour.
Plus and Minus Symbols
Every car battery has a plus sign (+) moulded or stamped into the plastic case next to the positive terminal post and a minus sign (-) next to the negative post. These markings are part of the battery casing itself. They do not fade, peel, or wear off under normal conditions. Some batteries also print “POS” and “NEG” or “P” and “N” near the respective terminals. If the cable colour is unclear, the symbols on the battery case are the most reliable way to confirm which terminal is which. A quick wipe with a dry cloth clears corrosion or grime from the markings.
Terminal Size
The positive terminal post is physically larger than the negative post. On standard automotive batteries using SAE (Society of Automotive Engineers) terminals, the positive post measures approximately 19.5 mm (0.77 inches) in diameter. The negative post measures approximately 17.5 mm (0.69 inches). This size difference is a deliberate safety feature. A clamp designed for the negative terminal will not grip the larger positive post properly, and a positive clamp will be too loose on the smaller negative post. If both terminals look identical and the markings are obscured, the thicker post is positive.
Coloured Caps and Covers
Many batteries come with a red plastic cap or boot over the positive terminal. Some vehicles have a red protective cover moulded into the positive cable terminal clamp. The negative terminal is either left exposed or covered with a black cap. If a red cap is present on one terminal and no cap on the other, the capped terminal is positive.
Cable Routing
If every other identification method is obscured, tracing where each cable goes can confirm polarity. The negative cable connects directly to the engine block or to a bolt on the chassis (the body ground). It is typically shorter and runs a short distance from the battery to a bare metal point on the engine. The positive cable runs to the fuse box, the starter motor, or a power distribution point and is typically longer and routed through a protective loom or conduit. The cable that bolts to bare metal on the engine block is the negative.
Why Getting the Polarity Right Is Critical
Connecting cables to the wrong terminals can cause serious damage to the vehicle’s electrical system and creates a genuine safety risk. A car battery stores enough energy to produce hundreds of amps of current. Reversing the polarity sends that current through circuits in the wrong direction, and the consequences range from a blown fuse to a destroyed engine control unit (ECU).
Blown Fuses and Fusible Links
The first line of defence against reverse polarity is the fuse box. Many circuits are protected by fuses that blow instantly when current flows in the wrong direction, cutting power before the downstream components are damaged. Some vehicles use fusible links (heavy-gauge wire designed to melt and break the circuit under extreme current) as additional protection near the battery. A blown main fuse or fusible link costs $5 to $30 (£4 to £24) to replace, but diagnosing which fuses have blown can take time if multiple circuits are affected.
Damaged Electronics
Modern cars have dozens of electronic control modules: the ECU, body control module (BCM), transmission control module (TCM), ABS module, airbag control unit, infotainment system, and instrument cluster are all connected to the 12-volt electrical system. These modules contain semiconductor components (diodes, transistors, and microprocessors) that are designed for current flowing in one direction. Reverse polarity can destroy them instantly. Replacing a damaged ECU costs $500 to $2,000 (£400 to £1,600). An airbag control module costs $200 to $600 (£160 to £480). The total repair bill for a reverse-polarity connection on a modern vehicle can run into thousands.
Battery Damage and Hydrogen Gas
Connecting cables incorrectly can cause the battery to release hydrogen gas at an accelerated rate. Hydrogen is flammable and can be ignited by a spark at the terminal, which is why the correct jump-start procedure avoids making the final connection at the battery itself. In extreme cases, a reverse connection can cause the battery to overheat, swell, crack, and leak sulphuric acid. This is rare with a brief accidental connection but possible if the reversed cables are left connected for more than a few seconds. Maintaining the battery properly and knowing the correct terminal identification prevents this scenario entirely.
How to Jump-Start a Car Safely
Jump-starting is the situation where correct polarity identification is most critical. The process involves connecting two batteries with jump leads (jumper cables), and every connection must go to the correct terminal. The leads themselves follow the same colour convention: red clamp to positive, black clamp to negative.
Connection Order
The correct sequence is: connect the red clamp to the positive (+) terminal of the dead battery first. Connect the other red clamp to the positive (+) terminal of the donor battery. Connect one black clamp to the negative (-) terminal of the donor battery. Connect the final black clamp to an unpainted metal surface on the engine block or chassis of the dead car, away from the battery. This final connection is made away from the battery deliberately. It prevents a spark occurring near the battery, where hydrogen gas collects. Making the final connection on the engine block grounds the circuit safely.
Start the donor car and let it idle for two to three minutes. Then start the dead car. If it does not start on the first attempt, wait another two to three minutes and try again. Once the dead car is running, disconnect the cables in reverse order: black from the engine block of the previously dead car first, then black from the donor battery, then red from the donor battery, then red from the previously dead battery.
After the Jump Start
Drive the car for at least 20 to 30 minutes after a successful jump start to allow the alternator to recharge the battery. A short trip of five minutes is not enough. If the battery dies again within a day or two, the battery itself is likely at the end of its life and needs replacing rather than recharging. A healthy battery that went flat due to leaving the lights on or the radio running will recharge fully from normal driving and should not need a second jump. Checking the fluid levels and electrical connections after a flat battery episode is good practice.
Battery Cable Maintenance
Battery cables require very little maintenance, but the terminals and clamps do corrode over time. Corrosion appears as a white, blue-green, or powdery crust around the terminal posts and cable clamps. It is caused by a chemical reaction between the lead terminal, the copper or lead clamp, and the hydrogen gas and sulphuric acid vapour that escape from the battery during charging cycles. Corrosion increases electrical resistance at the connection, which can cause slow cranking, hard starting, dimming lights, and eventually a no-start condition even when the battery itself is fully charged.
Cleaning corroded terminals takes five to ten minutes. Disconnect the negative cable first (always negative first when disconnecting, positive first when reconnecting). Use a wire brush or a dedicated battery terminal cleaning tool ($5 to $10 / £4 to £8 from any auto parts store) to scrub the post and the inside of the clamp until both surfaces are clean, shiny metal. Apply a thin coat of petroleum jelly or battery terminal protector spray to the clean surfaces before reconnecting. This creates a barrier against future corrosion. Reconnect the positive cable first, then the negative.
If the cable clamp is cracked, severely corroded, or the bolt that tightens it is stripped, replace the clamp. Universal replacement battery terminal clamps cost $5 to $15 (£4 to £12) each and fit with a single bolt. A full replacement battery cable, if the wire itself is corroded or damaged inside the insulation, costs $20 to $80 (£16 to £65) depending on the vehicle and cable length.
What the Positive Cable Connects To
The positive battery cable carries current from the battery to the vehicle’s electrical system. On most vehicles, the main positive cable runs directly from the battery to the starter motor solenoid. A secondary positive feed runs from the battery or starter to the main fuse box, which distributes power to every electrical circuit in the car: lights, ignition, fuel pump, infotainment, power windows, and all electronic control modules. Some vehicles route the positive cable through a battery current sensor before it reaches the fuse box. This sensor monitors how much current is flowing in and out of the battery and reports to the engine management system, which uses the data to regulate alternator output and manage battery health.
What the Negative Cable Connects To
The negative cable connects the battery’s negative terminal to the engine block or a chassis ground point. This completes the electrical circuit. The car’s body and frame serve as the return path for electrical current, which is why automotive wiring uses a single wire to each component rather than a pair. The component’s ground connection is made through its mounting bolts to the body or frame, and the current returns to the battery through the metal structure of the car. A loose or corroded negative cable or ground strap creates the same symptoms as a weak battery: slow cranking, flickering dashboard lights, intermittent electrical faults, and hard starting.
Car Battery FAQs
Is red always positive on a car battery?
Yes. The universal automotive standard is red for positive and black for negative. This applies to battery cables, jump leads, battery chargers, and all automotive wiring. No manufacturer uses a different colour convention for polarity.
What happens if I connect the jumper cables backwards?
Connecting jumper cables in reverse polarity can blow fuses, damage electronic control modules, fry the alternator diodes, and in the worst case cause a battery to vent hydrogen gas that ignites from a spark at the terminal. If cables are connected backwards and a spark or pop occurs, disconnect them immediately. Have the electrical system inspected before attempting to start the car again.
How do I know if my battery terminal is corroded?
Corrosion appears as a white, blue, or greenish powdery buildup around the battery posts and cable clamps. It is visible without any tools. If the car is slow to crank or the headlights dim noticeably when starting, corroded terminals are one of the first things to check. Cleaning and reconnecting the terminals often resolves the symptoms immediately.
Sources

Leave a Comment
More in News

How Kentucky’s New School Bus Law Now Requires Stops in Both Directions

How Massachusetts Speed Cameras Could Start Fining Drivers This Fall

McMurtry Speirling PURE Track Car Debuts in the US With 1,000bhp for $1.3 Million

Honda Passport TrailSport Gains More Ground Clearance and Off-Road Tech for 2027

How to Claim Up to $4,500 From the New Kia and Hyundai Theft Settlement
Trending on Motoring Chronicle
How New York’s Driver Point System Overhaul Could Suspend Your License Faster

New LEPAS Brand Opens UK Orders for L8 PHEV SUV from £34,900
Running a Red Light Is a Gamble With Other People’s Lives
Why Home EV Charging Now Costs Half as Much as Gas at 5 to 6 Cents a Mile